FIVE CHEAP, SIMPLE AND QUICK WAYS TO IMPROVE
THE CONDITION OF VINTAGE JEWELRY
|
Okay, not everyone is comfortable with doing their own vintage costume jewelry repairs or even cleaning their own pieces. We all know that some of this stuff can be fragile and I dare say that most of us (and maybe ALL of us) have ruined a piece or two along the way in our efforts to fix something. But I truly believe that there are a few things that every one of us, regardless of skill set or experience, can do to improve costume jewelry condition. Here are some tips appropriate for even a novice, and some basic and simple procedures. Caveat: I will not take responsibility for any mishaps resulting from the advice, uh, information, given in this article. Just watching my behind here!
Here are my top five tips for improving the condition of your vintage costume jewelry:
1) Examine every piece with a 10X loupe and use tweezers to remove any stray fibers, string, hairs, etc. To be honest, removing the hairs is the best tip I can possibly share with you. If it’s a piece of jewelry that’s always been yours (or at least handed down through the family), you probably won’t mind a hair or two showing up. But…eeeeewwww…someone else’s hair. Yep, that’s a problem. Especially if it doesn’t exactly look like it came from someone’s head…okay, we won’t even go there! And, yes, I may already be adding to your list of needed tools (10X loupe and tweezers), but I will not apologize: The 10X loupe is at the top of my list of “must-have” vintage costume jewelry “tools” and tweezers should be around the house anyway. Even if you don’t tweeze your own brows, at the very least you may need them in an emergency to remove a splinter. I rest my “tool” case!
|
 |
| 10 X LOUPE AND TWEEZERS |
|
|
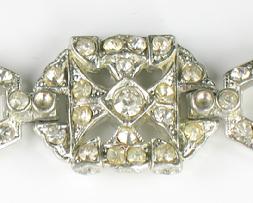
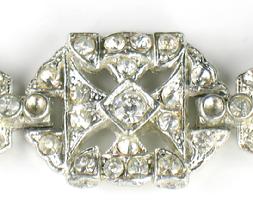
2) Remove original (and also post-original) glue residue with acetone. Ever look at a piece and think, “Wow, that’s gorgeous” only to put it under a different light or, worse yet, take a photo, and see lots and lots and lots of yellowing caused by glue residue? There really is a simple solution to this problem: Dab a cotton swab (better known to most of us as a “Q-Tip”) in acetone (better known to most of us as, uh, nail polish remover), and apply to the piece to remove the glue. Now, there are definitely different approaches here, depending on the amount of glue residue and the type of piece. Start with a small amount and, if all is going well, increase the amount of acetone as needed. Also be aware that excessive application may loosen the glue holding the stone; it could fall out and need to be re-glued. Acetone WILL remove enamel, some metal platings, melt plastics, ruin a perfectly good manicure, dissolve fingers; okay, perhaps the last was a wee bit of an exaggeration, but you do need to be careful when using acetone. (Please read the label, as there are also ventilation precautions and I do NOT want to be responsible for half of the JR list passing out on any given day…Judi would kill me!). All that behind us, a little acetone on a swab can remove tons of glue from both the metal elements and the tops of stones and, quite simply, make a nasty-looking piece of jewelry look wonderful! Do pay close attentions to my warnings, but also know that the acetone swab can safely be used on rhinestones and most metal finishes. Below, you’ll find a bracelet centerpiece that is undergoing restoration with photos before and after just a few quick swipes using the cotton swab/acetone application.
|
 |
| GLUE RESIDUE - BEFORE |
|
|
 |
| GLUE RESIDUE - AFTER |
|
|
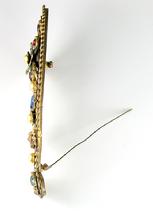
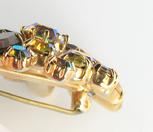
3) Straighten bent pin stems. Ever been frustrated by a bent pin stem on a brooch or pin? You go this way and that way and it’s still bent; maybe even in worse shape for all your efforts. Well, there’s an easy way to straighten pins! For this procedure, you’ll need two pairs of pliers. Preferably the type without grooving inside the jaws, i.e. they should be smooth in order not to damage or mar the metal. Hold one in the left hand and one in the right hand. (If this part is already too technical, solve the problem by sending me all of your brooches that have bent pins and skip to tip 4. Yes, I will straighten the pins and no, you will not be getting them back!) Place the first pliers right at the point where the bend starts. Place the second pliers just in front of this point. Holding pliers #1 firmly, apply pressure to pliers #2 in the direction apparent to correct the bend. Repeat as necessary to have a smooth pin. Yes, this really does work and, yes, it’s pretty easy to do. Just take it slowly, bending a little at a time until you’ve achieved the desired result. And keep in mind that straightening the pin stem not only improves the condition of a pin or brooch, but also helps to prevent accidental loss since a bent pin stem is shortened and may not extend fully into the catch.
|
 |
| BENT PIN STEM |
|
|
 |
| TWO-PLIER METHOD |
|
|
 |
| STRAIGHT PIN STEM |
|
|
4) Replace peeling “pearls”. It’s a fact: Not everyone has the ability, the desire or the four or five hands needed (okay, slight exaggeration, but not by much) to do their own rhinestone replacements. But replacing imitation pearls is so easy, you CAN do it! And, it goes a long, long way in improving the appearance of piece of jewelry. Here are the basic steps:
a) Use a sharp pointed tool (dental pick, pointed tweezers, even a long, sturdy pointed straight pin) and “pop” out the offending, nasty “pearls”.
b) Buy a mix of pearls in white and cream, and various sizes. Very readily available from many sources and quite cheap to obtain.
c) Also buy GS-Hypo-Cement. Also very readily available, inexpensive and the perfect glue for this project, as it dries somewhat slowly and also dries to a clear finish.
d) Clean the “cup” where the previous “pearl” was in residence with a swab dipped in acetone (see idea 2 for more info). The cleaner the “cup”, the better the end result.
e) Select your “pearl” or “pearls” that will be the right replacements for the ones you removed from the piece. A paper plate with a rim (raised edges) and lined with a paper towel is a good place to set the piece of jewelry and the replacement “pearls”.
f) Put a little drop (no more than fills half the “cup”) in the spot where the new “pearl” will reside. Wait at least 30 seconds, or up to a minute.
g) Place the “pearls” into the “cups”. If larger in size, fingers work just fine to do this; if smaller, you might want to use tweezers.
h) Use either a finger or a flat wooden toothpick to apply some light pressure to the pearl to “seat” it into the “cup”.
i) Voila! You did it, Kiddo!!!
WARNING: This process will not make ugly vintage costume jewelry pretty, but it will help to restore otherwise lovely pieces!
|
 |
| G-S HYPO CEMENT |
|
|
 |
| SELECTION OF 'PEARLS' |
|
|
5) Tighten prongs on loose stones and settings. Did you ever wonder why so much vintage jewelry is found with missing stones, even when the stones are not glued in but are held with prongs? Well, most pieces have prongs that are part of the original design casting and the base metal used is often what is known as “pot” or “white” metal. This metal tends to be softer and more pliable than most precious metals and the prongs, even with normal wear, frequently lift away from stones and settings. It’s also possible that the prongs may not have been fully closed when the piece was manufactured, as stone setting was done largely by hand rather than machine. Not to mention loosening from accidentally catching a prong on fabric (clothing, hand towel, etc.). The good news is that tightening prongs is incredibly easy to do! And the process requires only a simple household item; a plastic drink stirrer. You know the ones I mean…typically bright colors, about 5 ½” long, four-sided with a ball-shaped head and a pointy end. Place one of the flat edges of the stirrer at the base of the loose prong and firmly roll it over the prong and the stone. It works like a charm! Are you a teetotaler without any of these handy drink stirrers? Do not despair; they’re easily found in drug stores, grocery stores and online. Also known as “swizzle sticks”, be sure that you get the heavy, four-sided plain ones as lighter ones will easily break. Now, take a good look at all of your prong-set pieces with your 10X loupe and get those prongs tightened BEFORE you lose a stone. After all, Murphy’s Law says that the next stone that falls out and is lost forever will be one of those impossible-to-find unusual shapes or colors. So please don’t let your jewelry fall victim to loose prong syndrome!
|
 |
| PRONGS LOOSE ON CENTER STONE |
|
|
 |
| DRINK STIRRERS |
|
|
 |
| PRONGS TIGHTENED |
|
|
That’s it. My five cheap, simple and quick tips for improving the condition of your vintage costume jewelry. And, I stand by my statement that these tips are for everyone….Yes, YOU Can Do It!
Sparkles to All,
Mary Ann
© 2010 Mary Ann Docktor-Smith – All Rights Reserved
|
 |
| More Jewel Notes from Mary Ann |
|
|
|
|